Steps for Piston Engine Removal
Steps to Consider when Performing a Piston Engine Removal
Aircraft piston engines are usually monitored for proper operation and power output before each flight, and again in more detail, during scheduled oil changes or inspections. Without a properly running engine, the pilot/owner is faced with the reality of handing things over to the maintenance provider for a closer look.
Those depending on the aircraft to run in accordance with the published parameters usually appreciate the work of the technician, or at least unconsciously trust that everything will work as it should. The technician’s routine includes, but is not limited to, a good visual inspection, operational testing, magneto timing and cylinder compression checks, all in an effort to determine the continued serviceability of each and every engine that they maintain.Operating concerns can also include time in service, lack of pre-heating in winter and/or frequent cold starts, inefficient fuel management, inefficient cooling and an overall lack of regular use.
These are some of the main symptoms that mechanics consider in their assessment of an engine for continued operation. The pilot must also be aware of, and report, any indications that suggest the engine is not running as expected and make notes if necessary.
Even when things are going well though, there comes a time when that power center of the aircraft is going to reveal increased signs
of wear and tear. This may take the form of one or more suspect observations, such as the gradual failing of cylinder compression, an increasing level of metal contamination in the oil, or a noticeable loss in power output.
The engine may also have reached its published TBO (Time Between Overhauls) or another pre-determined limit of on-condition operation until the tough decisions come into play concerning repair or overhaul options. The published TBO is really a carefully speculated target time for the engine type, dependent upon the many variables associated with operation and/or maintenance. Any one of these preceding factors may be responsible for, or at least contribute to, the decision to end another chapter of a piston engine’s serviceability and ultimately its long-term reliability. Once it has been determined that major overhaul is imminent, then engine removal becomes the next step.
Other more immediate causes for engine removal may include sudden stoppage, such as with a propeller strike, or other types of accident-related occurrences such as immersion in water or oil starvation. It could also point to oil filter or screen evidence proving a sharp increase in critical engine wear metals. Either way, these mechanical workhorses aren’t designed to last forever, but they are capable of providing many hours of continued service when regularly and properly maintained and operated.
Engine care is in the hands of both the operator and the maintainer. The inevitable process of having to remove the engine from its familiar perch, firewall forward, will eventually come, and the trusted maintainers must be prepared to see it through with planned efficiency.
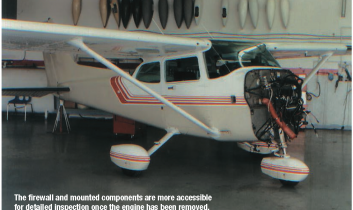
Engine removal can be a rather involved procedure when considering the condition of the accessories, hoses and other attachments. Engine removal also creates an opportunity for the technician to take a closer look at the firewall-mounted equipment and wire bundles, the engine mount and its welds, the baffles, seals and all mounted components. There is much more to consider beyond freeing the engine of its connections, hooking it up to a hoist, and hauling it out with reckless abandon.
More complex installations will require us to consider taking some strategic photographs of the engine configuration, and specifically, the routing of hoses, lines, wires and controls. Sometimes it just looks as though there is no real order to it when there actually may be a good reason for the existing routing. The opposite is also true when it may be necessary to correct an installation that was not planned well or was vulnerable to wear or stress. The time taken to ensure this step before disconnecting these items will often pay off when the time comes to reverse the procedure. Previous experience and a good memory help as well, but pictures can tell a story to whoever takes on the job of reinstallation. Labeling these items with masking tape or making detailed notes is also beneficial when there is the need to identify the specific orientation of hardware attachments or other key details such as specific routing and tie-offs. It also pays to have the service manual available in order to verify what we see versus what we should see so that we do not ultimately assume too much when looking ahead to the re-installation process.
If fluid carrying hoses are to be re-used and remain attached to the firewall, then the open end of the hose must be capped to prevent any foreign debris from entering the line. These hoses should really be flushed out as well to ensure that the concern of any contamination from the removed engine has been washed away. Hoses that are not due to be replaced, usually by calendar time, should be inspected for unusual wear or abrasion that could shorten the service life of the hose. Engine compartment hoses should have adequate heat protection, usually in the form of a fire sleeve material or strategically placed heat shields and stand offs. Ensure that any repairs to these items are done at this time. Replace any hose whenever continued serviceability is questioned. A failed hose in flight can quickly stop things from going round and round. It is a great advantage for the maintainer to act on these items with the engine going out so that all of these areas can be addressed now rather than later when the return to service status is anticipated.
 The engine change is also an ideal time to research the service hours on components like the alternator, vacuum pump or muffler assemblies. Consider whether it is an appropriate time to have these items overhauled or serviced in preparation to meet the newly repaired or overhauled engine being installed. The first few hours of operation could become frustrating when dealing with vacuum pump or alternator problems that could have been addressed at the engine change. If engine components are not specifically tracked in the technical records, it may be a good idea to include the status of these items in the maintenance entry, or at least on file for the engine change.
These are all good-to-know details for the “next person” and are most appreciated when that “next person” is you. The muffler should be carefully inspected and the heater shroud (if installed) cleaned of baked on oil drippings. Look closely at the intake scoop, hose or air box and its attachments for wear, loose rivets and cracks hidden by dried fuel and/or oil stains. Undetected flaws in this area could permit ingestion of dirt which shows up as increased silicon content in the oil analysis. Now that’s no way to treat a new engine!
 A new or newly overhauled engine often comes equipped with new or overhauled magnetos, fuel pump, carburetor or fuel control unit and starter. The rest of the items must be cleaned, researched and inspected before continued service. Other replacement items at this time
include the inlet air filter, worn SCAT hoses and heat-damaged or brittle wiring. Wiring bundles, clamps or tie wraps on the firewall should be checked carefully for chafing or other issues that could be corrected when access to this area has never been better. The firewall inspection can even be extended to include the structural concerns that may be more difficult to inspect during routine checks. Consider the instructions for continued airworthiness for additional components specific to the aircraft, such as engine analyzers, other temperature probes and pre-heaters. These items too often get set aside and put back on just as they were removed. These considerations are not intended to create more work as much as taking advantage of the accessibility to these items, thus leaving less work for later.
One of the first steps for engine removal is the all-important tail stand (as required) before the actual releasing of the engine from its mount to compensate for a tail-heavy condition. Be careful with undoing and moving engine controls aside so that they are not bent too sharply or damaged any other way. The same goes for the soft primer lines woven around the sump and in between cylinders. The oil should also be drained before removal to avoid a mess on the floor later on. The steel tube engine mount and its welds are often taken for granted, and having the engine off permits the opportunity to remove the mount for closer cleaning, inspection and non-destructive testing. Once this has been completed, the engine mount can then be painted and mounted back onto the firewall in preparation for new engine shock mounts, hardware and of course, the engine itself which is dependent upon serviceable attachments making for a complete and reliable powerplant installation. While not always necessary, many of the steps described above are addressed out of convenience and may be purposefully included in the aircraft maintenance schedule.
The propeller is not necessarily part of the engine change program per se but it should nevertheless be inspected at the same time. A constant speed model subject to wear metal contamination must be flushed out and inspected as well. Dynamic propeller balance will be affected by the engine change and should be re-done as desired by the operator. Always store the propeller in a safe location and off the shop floor to avoid unnecessary damage or contamination. Check spinner, bulkheads, ring gear and the alternator belt (if installed) for condition before reinstallation since they have already been removed for the engine change.
As with any routine inspection, the items removed from the outgoing engine should be cleaned and set aside to a designated area of the shop so that these particular inspections and repairs can be organized. Make note of any special fittings that need to be set aside and those that would normally be kept with the engine.
Items like the oil temperature bulb, oil pressure fitting and alternator/generator brackets which usually belong to the airframe manufacturer should be checked for overall condition and retained for later. Take the time to order any parts, including gaskets and hardware, ahead of time in preparation for the engine installation. Some shops have prepared an engine removal checklist to use in the same manner as an aircraft inspection checklist to ensure that all necessary steps are taken for both engine removal and the reversed installation procedures. The engine log book must also be updated and be kept with the engine as an ongoing record of maintenance events and release entries.
It would be a stretch to include the many possible scenarios associated with the different types of aircraft and engines and the methods used to bring them together. My intention here is directed more towards reviewing some of the more common steps or reminders associated with engine removal. It is also an opportunity to consider implementing formal procedures or introducing certain nuances for engine removal through company training or from our old friend, tribal knowledge. Whether there are some new ideas here for some to consider or just common sense review for others, let’s take the time to do a complete and efficient job with engine removal.
About The Author
Stuart McAulay resides near Cambridge, Ontario and enjoys the Brantford Flying Club.
View all articles by Stuart McAulay.